
 When it comes to my girls’ birthday parties, I tend to go a little overboard. Okay, okay, A LOT overboard. Shhh…don’t tell my husband that I actually admitted that. It’s just that birthdays are such a big deal for little kids and I want it to live up to every single one of their expectations. I know that my mom went all out on my parties and I want my kids to have that experience too.
But for me, it’s not about spending money, it’s more about the personalized details that go into their parties. The colors, the theme, the decor, the food…making sure that all the details are what they like. Last year I was just too sick and tired (morning sickness) to add any real personalization to their parties. Sure I decorated, but that cute Minnie Mouse door decoration? Etsy purchase. The banner? Party City. And there were no centerpieces at all.
This year I was determined to put a little more effort into the their parties, and I since I’ve been on a wreath kick, I decided a princess door decoration – or wreath – was on the agenda. I actually started thinking about this as I finished up my St. Patrick’s Day Yarn Wreath, but wasn’t sure exactly how I would do it. The hard part was going to be getting Princess Sofia “standing in the center of the wreath, a 3 dimensional idea on a flat piece of…well, I wasn’t sure what. Ideally it would have been a thin piece of wood, but then I had no way to cut it out. Next I thought of foam board, but again, I would have no way to cut the princess out of the foam board with smooth edges. Luckily, my mom was there, and, as always, she helped me find the best way to do it. Turns out, it wasn’t hard at all. In fact, this wreath is actually quite simple.
If you’re planning a princess party, a wreath like this is a must! It also makes a very cute decoration for a little girl’s bedroom door after the party is over!
 You will need:
Yarn
Styrofoam wreath form (mine was 14″ to allow room for her name, but you could always do 10″ or 12″)
Wood letters (mine were already painted and glitter-ed, but if yours aren’t, you’ll need white paint and glitter)
Hot glue
Rubber cement
1 1/2″ Ribbon
Cardboard
Cardstock
Straight pins
Acrylic paint (mine was purple to match Sofia’s dress, but any paint that doesn’t clash with your princess will work)
Felt
Starch (and an iron)
Scissors
3 Sequins/beads/rhinestones
Step 1 – Find a picture of Sofia – or whatever princess you want to use – and print it on the cardstock. I got mine as a part of my party kit (an Etsy purchase from DigiPartyShoppe), so unfortunately I can’t share it with you, but you should be able to find one you like with a quick google search. Print the picture out on your cardstock, making it as big as you can without distorting it’s features. For example, on my 8 1/2 x 11 cardstock, my Sofia was between 9-10 inches tall. Once printed, cut out, cutting only around the outer edge of the princess.
Step 2 – Place your princess on to your cardboard and, with a pencil, lightly trace the outline of your princess. Cut princess silhouette out of the cardboard, making it slightly smaller than the princess on the cardboard. In other words, want your cardstock princess to be slightly bigger than your cardboard princess silhouette.
Step 3 – Using the Rubber Cement, paste the cardstock princess to the cardboard silhouette that you just cut, making sure you can’t see the cardboard at all. And make sure to use Rubber Cement for this step, as it could leave bubbles or wrinkles under your cardstock which would be visible when you hang the wreath. Once done, paint the back of the cardboard and allow to dry completely.
Note in the picture that I accidentally cut a little too much off of my traced cardboard princess and amputated her arm. If you cut off to much, it’s okay. Just use a little tape to reattach the missing areas, then rubber cement on top of that and place the cardstock princess on top. I wouldn’t tape the back of the princess for fear that the paint will bead on top of it instead of covering smoothly.
Step 4 – Wrap your wreath in yarn, pulling tightly and trying not to overlap. I used the same technique as I did with my St. Patrick’s Day Yarn Wreath.
Step 5 – Trace your flowers on to your felt and cut them out. Spray felt flowers with starch and iron. Essentially, you’re just trying to get them to be a little stiffer so when you hang the wreath they don’t immediately flop over. If you can find stiff felt, that’s a great short cut, but I wasn’t able to find any in my colors.
Step 6 – Determine the top of your wreath and, using hot glue, attach the letters (making sure they’re on the front of the wreath, not on the top!).
Step 7 – Using hot glue, attach the princess form to the bottom front of the wreath (note: you don’t want her sitting inside the circle, you want her on the front). Once glued, use straight pins to secure princess. This started out as a precaution to make sure that the princess stayed attached, but it ended up making her stand up a little more. Although the straight pins step could be skipped, I definitely recommend using them. Step 8 – Place your flowers on top of the bottom of your princess, hot gluing them down one layer at a time. Make sure that they completely cover your cardboard so no one can tell how you attached the princess. It only took a small dab of glue in the middle of each layer to accomplish this. Once your third flower layer has been secured, place sequin/bead/rhinestone in the middle.
Step 9 – Attach the 1 1/2″ ribbon to the back of the wreath, at an angle, using multiple pins. I wish there was an exact formula for how to get it to lay flat and even, but there really isn’t; you just kind of have to play with it until you find the proper angle. Once find the right angle, display it proudly for all your party guests to see! And if you liked this one, make sure to check out my Anna & Elsa Frozen Wreath Tutorial HERE. It’s one your Frozen Fan won’t want you to miss!
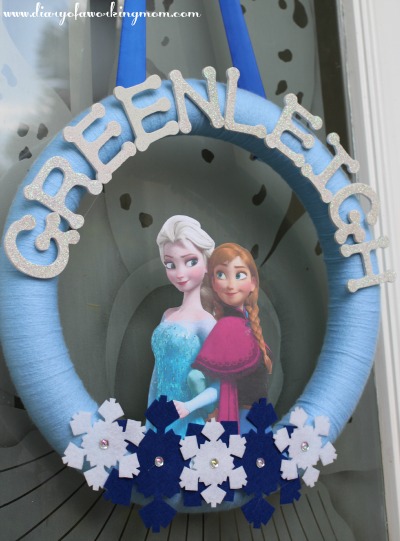

This is awesome!!! My niece would go nuts over this. I’m emailing this to my sister-in-law now. 🙂
So pretty and so easy! I bet you could do with an easter or other spring cutout easily to make it more “adult”. So cool!
I think this is perfect for girls! I absolutely love the purple!
LOVE! LOVE! LOVE! I will be making this for my 3 year old that is absolutely nuts about Sophia 🙂
I love it!! I would like to know where to find the wreath?
Pingback: DIY: Frozen Wreath Door Decor - Diary of a Working Mom
Beautiful, where did you buy the letters for the name
Thank you! I got them at Michael’s, but just about any craft store should have them.