So today was the big day – Hazeline’s 1st birthday party! And as much as I want to share every single picture with you, I don’t even have all of them downloaded yet, so that will have to wait for another day (probably Monday).
The days and weeks before Hazeline’s party seemed to move so quickly, that I somehow forgot to purchase the decorations I had picked out (months before) on Etsy. I was able to pick up some simple decorations at the store, but really wanted something handmade to decorate Hazeline’s high chair. It just didn’t seem right to let it go un-decorated, and I remembered having a high chair banner for Greenleigh when she turned one. Unfortunately, I wasn’t convinced of my ability to make one, nor did I have the Martha Stewart punches that make this a simple, 10-20 minute project. With the help of some friends I was able to make this awesome high chair banner for virtually nothing, and it only took about 60-90 minutes, most of which was spent tracing and cutting.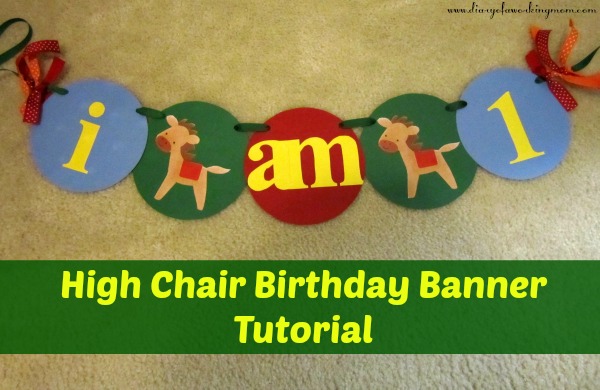
You will need:
White, Red, Yellow, Blue, & Green Card Stock
Compass
Pencil
Green ribbon
Hole punch
Scissors
Step 1 – I haven’t used a compass since high school, but I was able to pick one up for 99 cents, as opposed to the specialty Martha Stewart punch that was $15 (nothing against Martha, of course, but her stuff can be expensive!). I traced a 5.5″ circle using the compass on the colored cardstock. You will need 2 blue, 2 green, and 1 red circle. Once the circles are traced, cut them out. 
Step 2 – Using Word, type out the letters/numbers “i”, “am”, and “1” or whatever you want your banner to say in Times New Roman font on individual pages. Enlarge those numbers to 375 point font. Make sure the letters are in black when printing. Once printed, cut them out. You are going to use these as stencils when making your banner.

Step 3 – Turn your letters over, so the black side of the letter is facing the colored paper, and trace them. It feels weird, but you should be tracing them backwards. Then cut the letters out of the cardstock.
Step 4 – Print your animals out on the white paper, then trace around them. Cut the animals out. This took forever since there were so many little curves.

Step 5 – Paste the letters, numbers, and animals to your circles. Make sure to put them on the side of your circle that does not have the trace marks from the compass.
Step 6 – Punch two holes on either side of your circles. I placed mine towards the top of the circle, but you could put them in the middle if you preferred. Step 7 – Thread the green ribbon through the holes. Make sure that your ribbon will behind the majority of the circle.
 Step 8 – Once strung together, tie ribbon to the ends. This will help your circles stay in place and add a bit of color, depending on what colors you use. I had some orange and red left over from other projects, so I used that, but any color would do.
 Voila – cheap, easy decor! Total cost of this project was about $4.50. I got a ton of compliments on it too. I almost didn’t take this project on because I wasn’t sure if I could get it done in time, but I’m so glad I made something for her first birthday.
More pictures of the party on Monday!
cute banner! stopping by for the blog hop. i’m now following 🙂
http://livinthemommylife.blogspot.com
Awesome tutorial ~ love it! Happy Birthday ~ very creative and magical creation ~ thanks for linking up to Magical Monday Meme ~ if you haven’t already would you post a link or use my button to indicate you are linked ~ thanks again ~ namaste, Carol ^_^
Pingback: Hazeline’s Farm Themed First Birthday Celebration
I love this idea. i have attached bunting to everything at one time or another, but a highchair? awesome!!!
thanks for sharing this, like it. you gave me a great idea for my nieces birthday 🙂
Happy Birthday Hazeline. Such beautiful name. Great simple idea as well for new year decoration!